| 前 次 トップ |
ゲームの体裁を整える
(横はみ出し防止・下爆発防止・弾の破裂効果)
横はみ出し防止

まず、myCharが両端に行ったときに半分切れてしまいます。これではかっこ悪いので、調整しておきましょう。
| myChar.tonyu |
|---|
extends SpriteChar;

function onDie() {
  appear(new Bomb($myChar.x , $myChar.y ,$pat_Sample+4));
}

while(1) {
  i++;
  if (getkey(39)>0 && x<$screenWidth-20 ) x=x+3;
  if (getkey(37)>0 && x>20) x=x-3;
  if (getkey(32)>1 && i>20) {
    appear(new Tama(x,y,$pat_Sample+1));
    i=0;
  }
  update();
}
|
UFOにも同じ事が言えるので直しておきましょう。
| UFO.tonyu |
|---|
extends SpriteChar;
function appearEnemy() {
   if (rnd( 50 )==0) appear(new Enemy(x,y,$pat_Sample+2));
   if (rnd( 100 )==0 && $score>100) appear(new Yellow(x,y,$pat_Sample+8));
   if (rnd( 200 )==0 && $score>200) appear(new Red(x,y,$pat_Sample+11));
}
while(1) {
 while(x<$screenWidth - 40) {
   x=x+2;
   appearEnemy();
   update();
 }
 while(x>40) {
   x=x-2;
   appearEnemy();
   update();
 }
}
|
次に、Enemy、Yellow、Redも横壁をすり抜けてしまいます。これも訂正しておきましょう。また、下壁に当たると爆発してしまうので、爆発が見えないようにもしておきましょう。
| Enemy.tonyu |
|---|
extends SpriteChar;
function onDie() {
  appear(new Bomb(x , y ,$pat_Sample+4));
}
function atariHantei() {
  for (t in $chars) {
   if ( t is Tama && crashTo(t) )  {
     die();
     t.die();
     $score=$score+10;
   }
  }
  if (crashTo($myChar)) $myChar.die();
}
nexty=rnd(50)+100;
while (y<nexty) {
  y=y+2;
  atariHantei();
  update();
}
if (x>$myChar.x) vx=2; else vx=-2;
while (y<$screenHeight+15) {
  y=y+3;
  x=x+vx;
  if(x<15 || x>$screenWidth-15) vx=-vx;
  atariHantei();
  update();
}
|
| Yellow.tonyu |
|---|
extends SpriteChar;
function onDie() {
  appear(new Bomb(x , y ,$pat_Sample+4));
}
function atariHantei() {
  for (t in $chars) {
   if ( t is Tama && crashTo(t) )  {
     die();
     t.die();
     $score=$score+10;
   }
  }
  if (crashTo($myChar)) $myChar.die();
}
i=0;
d=1;
while (y<$screenHeight+15) {
  i++;
  y=y+1;
  x=x+d*sin(8*y)*10;
  if(x<15 || x>$screenWidth-15) d=-d;
  atariHantei();
  if(p==$pat_Sample+8) vp=1;
  else if(p==$pat_Sample+10) vp=-1;
  if(i%20==0) p=p+vp;
  update();
}
|
| Red.tonyu |
|---|
extends SpriteChar;
function onDie() {
  appear(new Bomb(x , y ,$pat_Sample+4));
}
function atariHantei() {
  for (t in $chars) {
   if ( t is Tama && crashTo(t) )  {
     life=life-1;
     if(life<=0) {
       die();
       $score=$score+30;
     }
     t.die();
   }
  }
  if (crashTo($myChar)) $myChar.die();
}
life=3;
i=0;
d=1;
if(x<$myChar.x) direction=1;
else direction=-1;
while (y<$screenHeight+15) {
  i++;
  y=y+1;
  x=x+d*(sin(16*y)*10+direction);
  if(x<15 || x>$screenWidth-15) d=-d;
  atariHantei();
  if(p==$pat_Sample+11) vp=1;
  else if(p==$pat_Sample+13) vp=-1;
  if(i%20==0) p=p+vp;
  update();
}
|
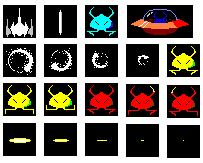
これで、敵と自機の体裁は整いました。
しかし、弾がRedに当たってもただ消えてしまうだけでは素っ気ありません。
弾の爆発パターンを付け加えて見栄えを良くしましょう。

Sample5.lzh
| Tama.tonyu |
|---|
extends SpriteChar;

function onDie() {
  appear(new Reflection(x , y ,$pat_Sample+14));
}
while(y>0) {
 y=y-8;
 update();
}
|
新しいオブジェクト作成し、Reflectionと名前を付けて、以下のコードを記入してください。
| Reflection.tonyu |
|---|
extends SpriteChar;

i=1;
while(i<=4){
  wait(5);
  p=p+1;
  i++;
}
wait(5);
|
敵が弾で焦げてしまったような効果ですが、これで一応、弾の爆発パターンもできました。
これで、ゲームらしいゲームにはなりましたが、これから敵を追加してゆくときなど変更が大変そうです。プログラムを効率よく見やすくするために、クラスの継承を使ってみましょう。
| 前 次 トップ |